Over the previous months I worked to improve my voice quality in video calls and for recordings. This included both hardware to record (a RØDE VideoMic NTG) and software filter out noise (VoiceMeeter, Cantabile, Reaper plugins).
This post summarizes what I’ve done. Please read about the choices I made and the difficulties I faced. I’m happy to hear how this can be improved.
Please note: This setup is still work-in-progress. It will change over time. If something doesn’t work for, if you have new ideas you want to share and discuss, please get in contact with me. There’s now also a post for a similar setup running Linux.
How it started
For the FOSDEM 2021 conference I need to pre-record a talk. I had been thinking about getting my voice quality to the next level for quite some time, but this was the tipping point.
The predecessors and how they performed
I tried wireless headsets for some time, like the Plantronics Voyager 8200 UC. It is a nice headset, and I still use it to listen to music and videos a lot, especially when there is background noise as it is has noise-cancelling functionality.
Having a microphone without the boom is helpful, but I found that it doesn’t pick up my deep voice as good as I hoped. Now and then I got the feedback that my recorded voice could be picked up better. I still use it for an occasional voice call, and I like the way it filters out my background noise for the people I call.
To attend voice calls, I moved on to Jabra Evolve 40, a light headset with a boom. During COVID-19 times I wore this headset for 6+ hours a day. It is a light headset, with a good integration in several software solutions, including Cisco WebEx and Microsoft Teams. The small controller on the desk allowed me to mute and unmute myself and to adjust the volume without touch my headset or my PC. While a lot of wireless headsets offer you these controls by touching the headset, I consider the physical controls on the desk of the Jabra Evolve 40 superior.
The feedback of my peers was that my voice quality was good and clear. Still it wasn’t studio quality, the microphone is still quite “narrow” with its 100 Hz to 10 kHz.
Getting to studio quality?
I did some research and finally ended up with a RØDE VideoMic NTG. It has a broader spectrum (20Hz – 20kHz) and a better microphone. I can connect it to the PC with a USB connector. Due to restrictions in my small local workspace at home I placed it on my desk on a Manfrotto MTPIXIEVO-BK Pixi Mini-Stand B together with an adapter 1/4" to 3/8" (Manfrotto 088 LBP). This way it was out of the way for the camera and the screens.
This allowed me to put the microphone near me — it shouldn’t be away more than 20-30 cm. As I’m recording indoors, I disabled all filters of the microphone, put on the foam windshield as a popscreen, added the built-in high frequency boost to compensate for the windshield, and I was ready to go.
Well, at least I thought that. I found that the microphone still took up a lot of my background noise like clicking of the mouse, the fan of my laptop when it was in power and not in quiet mode. The room I was in also had more reverb than I wanted.
So how to get studio quality audio with a studio microphone, but a non-studio room?
Postprocessing the audio
I watched several videos on how to process the audio. One of the best was Kris Meyer’s video about VoiceMeeter Banana, and adding additional ReaPlugs to it via Cantabile. This provided me with the following audio setup:

Things I can do with this setup:
- Record my voice for virtual meetings (like Teams, Zoom, Jitsi, etc.) or videos,
- filter out background noise (the fan of my laptop, clicking of my mouse),
- reduce the reverb of my room, and
- use audio sources like Sound Jay to play background sounds.
So why background sounds? Don’t you miss the sounds of an airport or restaurant in the background when meeting people online?!
Let’s walk through for the different tools.
Welcome to VoiceMeeter Banana
Like you’ve seen in the diagram above, VoiceMeeter Banana is central here. It provides all the switching for the different audio channels. In this setup channel A1 is my headphones, and B1 the VoiceMeeter Input I use for Teams etc.
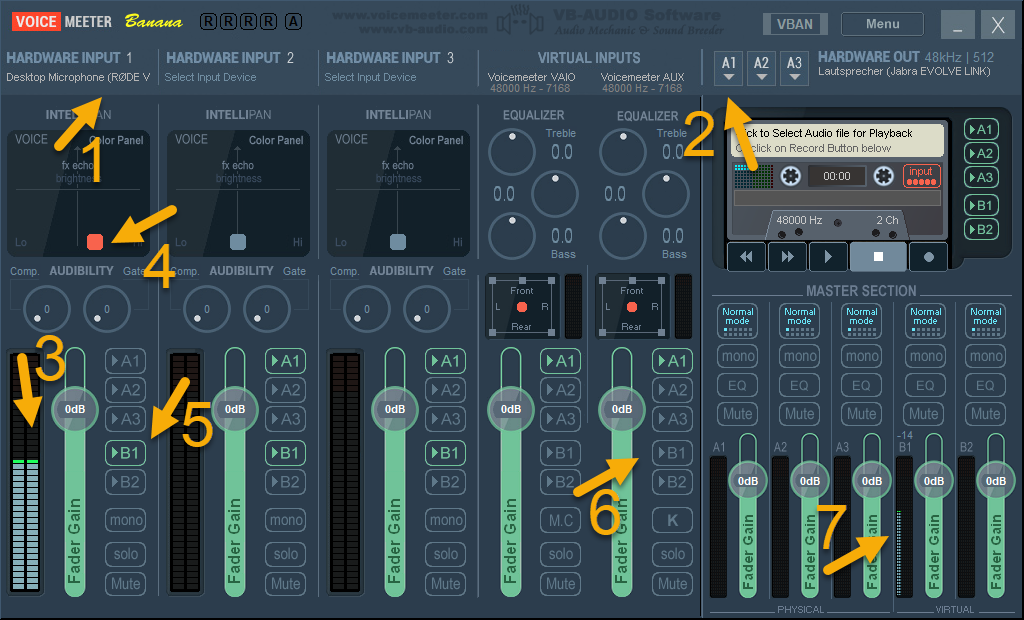
- Plug in the microphone as hardware input 1.
- Plug in the headphones to A1.
- See the indicator for the microphone move once I talk.
- Color my voice from deep to not so deep.
- Place the output of the microphone to B1. If I would also place it to A1, I could hear my voice on my headphones.
- Place VoiceMeeter AUX to channel B1 if I want to play sounds, a video or sound effects to Teams. A1 is always on here as I want to have that sounds on my headphones as well.
- See the indicator move for the output
Adding Cantabile to the mix
Cantabile allows me to host ReaPlugs. I use the light version of Cantabile: I had to register, but it is free. I can use them to plugin additional effects.
Kris' video contains all the details to set up Cantabile with VoiceMeeter Banana.
I found that I sometimes get only scratching noise and no properly recorded voice. I found some discussions on the net, but they didn’t help me much, yet. Sometimes the scratching is gone when using the on/off button in Cantabile. The most reliable setup was to start Cantabile first, and then VoiceMeeter Banana. There is a (German) tutorial that suggests pinning the process of Voicemeeter to a specific CPU, for now the starting order works sufficiently for me.
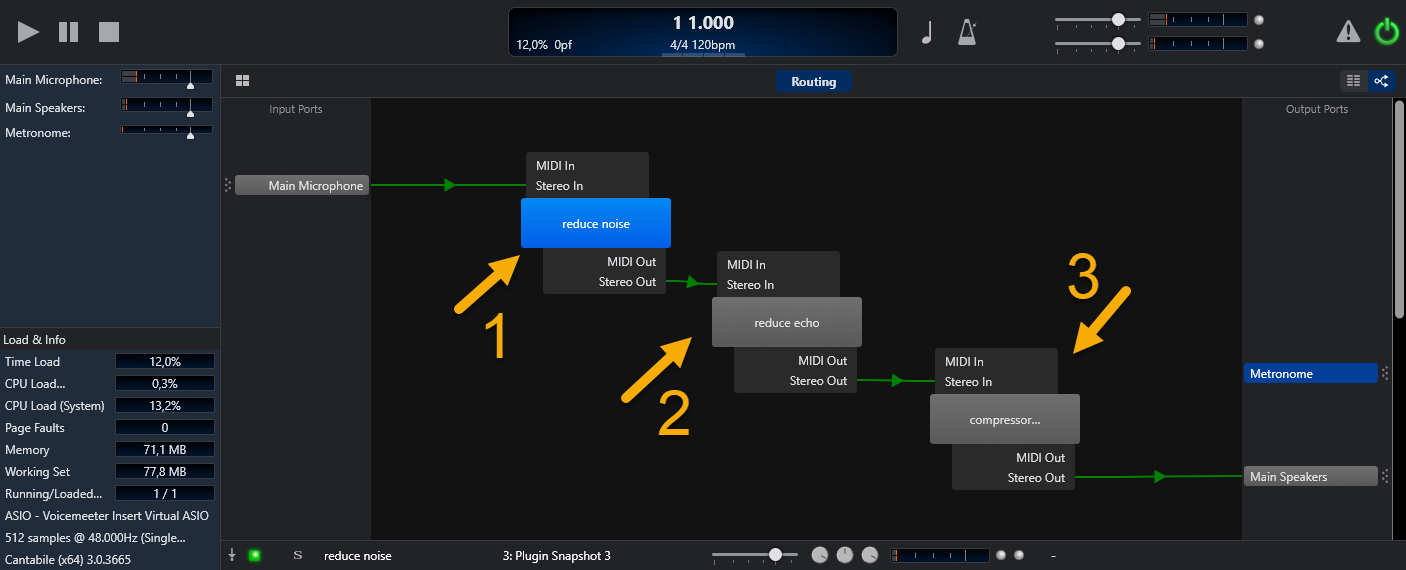
The effects are:
- reducing noise
- reducing reverb
- leveling the volume by using a compressor
Adding ReaFir to reduce noise (deprecated)
My first attempt was to use ReaFir to reduce background noise. While this works as described, I now recommend Xiph’s RNNoise, see next section for that.
Details on how I used to setup ReaFir
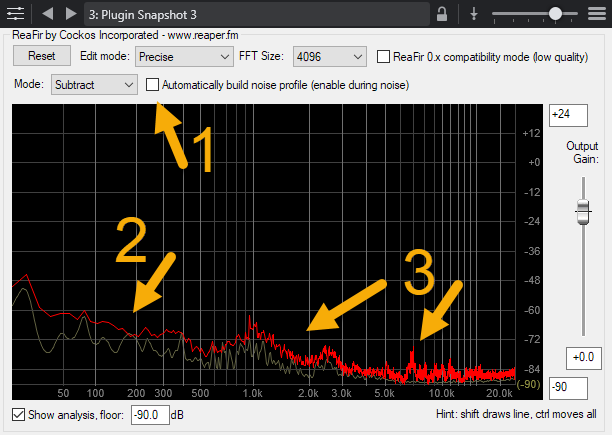
- Selecting mode Subtract to cancel out the noise. Enable automatically builds noise profile for some seconds background noise.
- This is the background noise of my laptop fan. The laptop also has a quiet mode.
- When recording the noise, I also click the mouse. That spike here cancels out the mouse clicks
The setup works OK for me in both video calls and when I record videos, but adds a slight delay. Reducing the sample size to 2048 reduces it, so I’ll use that on voice calls.
Low noises and for example clicks on the keyboard or mouse will sound a bit distorted, so I now recommend RNNoise.
Adding Xiph’s RNNoise to remove all noise
I now recommend Xiph’s RNNoise which is packaged as a VST plugin by werman.
It takes out noise from keyboard, mouse, fan and also the sound of me breathing in and out. It is basically amazing!
I tried to optimize the default settings of the plugin, still I didn’t see an improvement over the already excellent behavior, so I recommend to keep the defaults.
ReaJS plugin to remove echo
Then I take out the reverb using another ReaJS plugin.
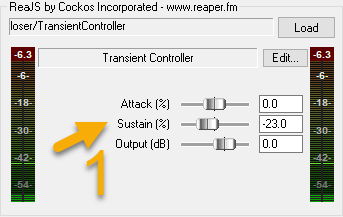
- Pushing Sustain to a negative percentage reduces the reverb.
ReaComp as a compressor
To level my volume when I talk, I add a compressor using ReaComp.
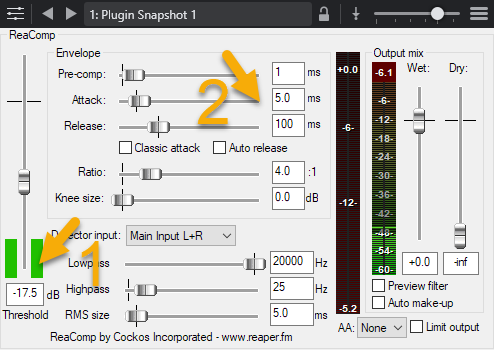
- Threshold of my standard speaking volume. When I talk louder, the compressor will kick in
- The compressor will engage 1 ms before I raise my volume, and will release for 100 ms.
Adding a soundboard
Ever wanted to add an applause to a voice conference call, or some background noise as if you were in an airport terminal or in a bus? There are a lot of free sounds to download at Sound Jay. You can use them as effects in your recordings, or during voice calls.
As a first test I played them via my browser and used the Voicemeeter Aux Input to play them during to other participants in the calls. Then I wanted to do more: it was tedious to search the sounds, and they always started with a small delay. Time for a real soundboard!
There is ultraschall that extends Reaper, but also comes with VST plugins that can be used for Cantabile. One of the plugins is a soundboard. Install it to Cantabile like any other plugin. Here’s what you can do with the soundboard:
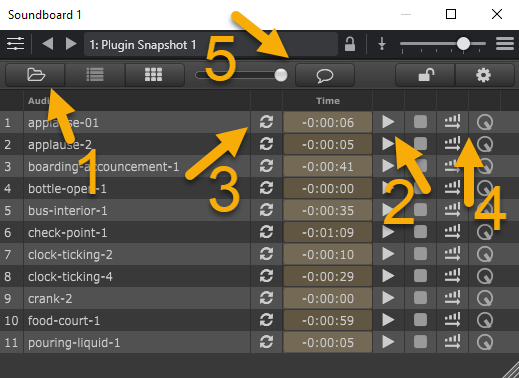
- Add sound recordings to the soundboard to play later.
- Start/stop playing a recording.
- Set repeat mode to play a loop.
- Fade in/out automatically or manually.
- Adjust the volume so they appear to be in the background to keep talking during the sounds.
For a first test, connect the soundboard to main output. To make the sounds appear on a separate input in Voicemeeter, take the following steps:
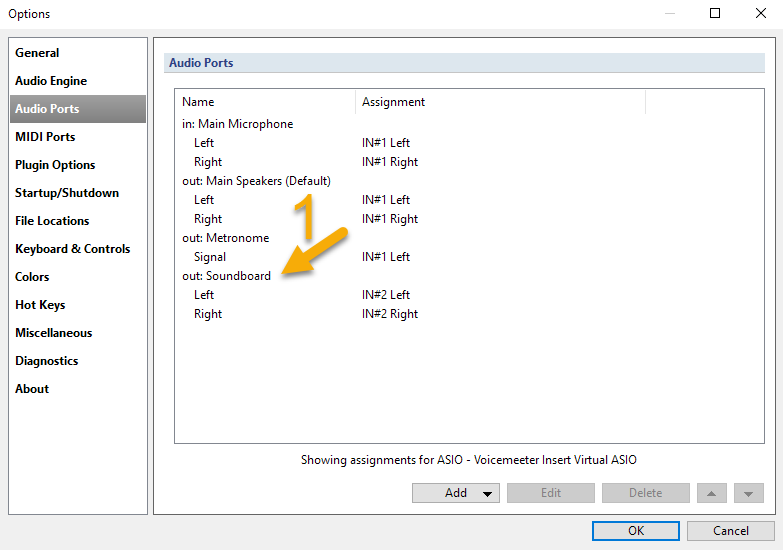
- Add another output to Cantabile, assign it to IN#2.
Then connect the output of the plugin to the new output in Cantabile.
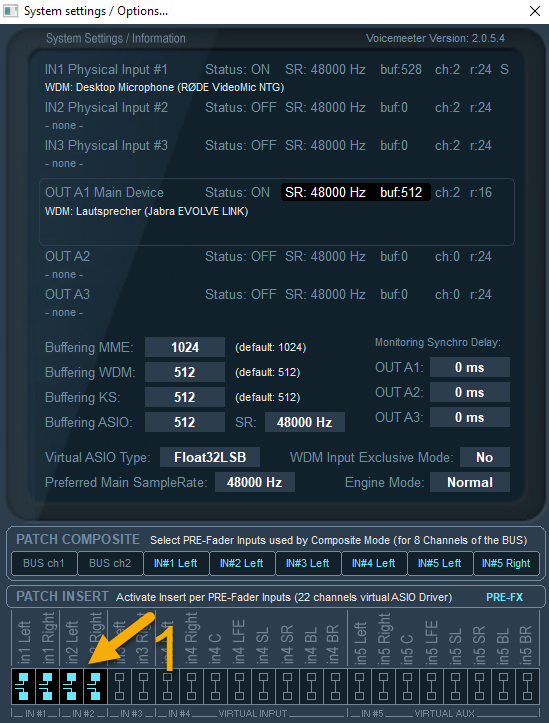
- In the System settings of Voicemeeter, patch the input IN#2
This way it is on the second hardware input in Voicemeeter. Now map the channel in Voicemeeter to A1 and B1: This way I can hear the soundboard sounds in my headphones (A1), and users can hear it as well (B1).
Looking to the future
Some things that I want to work on:
- There are lots of other noise and reverb plugins around there, both free and commercial. I want to give those a try and play with them.
- There’s also Studio-Link to allow N-1 connections (that is: conference calls). I found it in the distribution of Ultraschall, but it is available for download from its own homepage as well. It also comes with Studiolink and Studiolink-on-Air VST plugins, there is also a standalone version. Ready for live casting?
2021-03-05: Initial draft.
2021-04-30: Added paragraph how to add a soundbar.
2021-05-03: Adding link to Techium blog, updating diagrams
2022-03-27: Link to blog post how to do this on Linux
2022-10-15: Switching from ReaFir to RNNoise for noise suppression
